
<<< Previous Lecture ––––––– Next Lecture >>>
8th Lecture (Thursday 10/10)
Firmata
In order to control the Arduino from Processing, we need to use the Firmata protocol:
Example 1
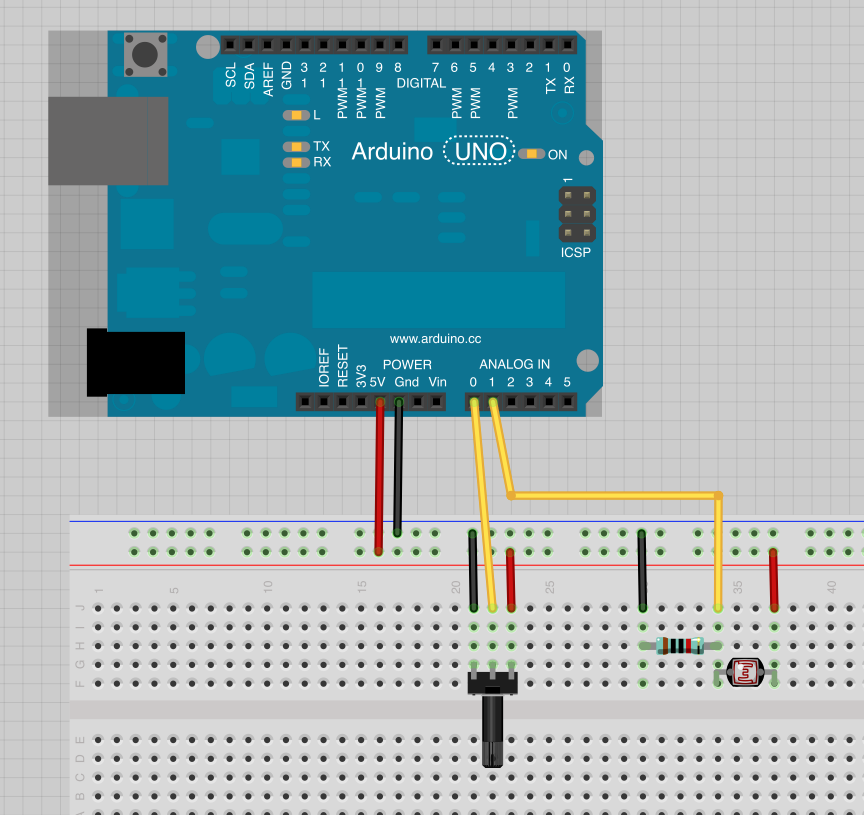
This example controls the drawing of an ellipse based on the values from the potentiometer and the color is controlled by the light sensor.
- Upload the StandardFirmata code to your Arduino (File –> Examples –> Firmata–> StandardFirmata)
- Connect a light sensor and a potentiometer
- Use the following code in Processing
import cc.arduino.*;
Arduino arduino;
float potentiometer=0;
float light=0;
float eSize=100;
float eColor=120;

void setup(){
size(400,400);
println(Arduino.list());
arduino = new Arduino(this, Arduino.list()[0], 57600);
}

void draw(){
//background(0);
potentiometer = arduino.analogRead(0);
light = arduino.analogRead(1);
print("pot: ");
println(potentiometer);
print("light: ");
println(light);
eSize = map(potentiometer,0,1023,30,300);
eColor = map(light,50,950,0,255);
fill(eColor,40,40);
ellipse(width/2,height/2,eSize,eSize);
}
Example 2
This example fades between two images based on the light level from the light sensor. When it’s dark it displays the night image and when there is more light it displays the daylight image.
The circuit for the Arduino is same as above.
Download images for this example.
import processing.serial.*;
import cc.arduino.*;
Arduino arduino;
PImage dayImg;
PImage nightImg;

float light=0;
float fade=120;

void setup(){
  size(400,400);
  println(Arduino.list());
  arduino = new Arduino(this, Arduino.list()[0], 57600);
  dayImg = loadImage("pic_day.jpg");
  nightImg = loadImage("pic_night.jpg");
}

void draw(){
  light = arduino.analogRead(1);
  println(light);
  fade = map(light,50,950,0,255);
  tint(255, fade);
  image(dayImg, 0, 0, width, height);
  tint(255, 255-fade);
  image(nightImg, 0, 0, width, height);
}
9th Lecture (Friday 11/10)
All of these use the same circuit as above. Light Sensor connected to analog pin 1. The Potentiometer is not really used, but feel free to hook it up to something also in the code.
Example 3 (Friday)
This example draws shapes on the screen in a randomized way. It’s controlled with the Mouse x-coordinate. We also looked at how the for loop works and how to use it to fill arrays.
void setup(){
  size(640,480);
}

void draw(){
  int eAmount = 23;
  float[] x = new float[eAmount];
  float[] y = new float[eAmount];
  float randVal=10;
  randVal = map(mouseX, 0, width, 0, 150);

  //background(0);
  fill(0,15); // select black color
  rect(0,0,width,height);

  for(int i=0; i<eAmount; i++){
    fill(104,random(120,200),194); // select white color
    x[i] = i*23 + 88;
    y[i] = 200 + random(-randVal,randVal);
    noStroke();
    ellipse(x[i], y[i], 20, 20);
    stroke(255,255,255);
    line(random(width), random(height), x[i], y[i]);
  }
Example 4 (Friday)
This is the same as above, but we are using a light sensor connected to the Arduino as an input.
import cc.arduino.*;
import processing.serial.*;
Arduino arduino;
float light = 0;

void setup(){
  size(640,480);
  println(Arduino.list());
  arduino = new Arduino(this, Arduino.list()[0], 57600);
}

void draw(){
  light = arduino.analogRead(1);
  println(light);
  int eAmount = 23;
  float[] x = new float[eAmount];
  float[] y = new float[eAmount];
  float randVal=10;
  randVal = map(light, 25, 950, 0, 150);

  //background(0);
  fill(0,15); // select black color
  rect(0,0,width,height);

  for(int i=0; i<eAmount; i++){
    fill(104,random(120,200),194); // select white color
    x[i] = i*23 + 88;
    y[i] = 200 + random(-randVal,randVal);
    noStroke();
    ellipse(x[i], y[i], 20, 20);
    stroke(255,255,255);
    //line(random(width), random(height), x[i], y[i]);
  }

}
Example 5 (Friday)
The last example was the Tree-sketch from Processing examples that we modified to use Arduino as an input. I recommend doing this a lot. Just finding interesting examples and trying out how you could make them interactive. The Tweak mode will help you a lot in this.
/**
 * Recursive Tree
 * by Daniel Shiffman.
 *
 * Renders a simple tree-like structure via recursion.
 * The branching angle is calculated as a function of
 * the horizontal mouse location. Move the mouse left
 * and right to change the angle.
 */
import processing.serial.*;
import cc.arduino.*;
Arduino arduino;
float theta;
float light=0;
void setup() {
  size(640, 360);
    arduino = new Arduino(this, Arduino.list()[0], 57600);
}

void draw() {
  background(0);
  frameRate(30);
  stroke(255);
  light = arduino.analogRead(1);
  // Let's pick an angle 0 to 90 degrees based on the mouse position
  float a = (light / (float) width) * 90f;
  // Convert it to radians
  theta = radians(a);
  // Start the tree from the bottom of the screen
  translate(width/2,height);
  // Draw a line 120 pixels
  line(0,0,0,-120);
  // Move to the end of that line
  translate(0,-120);
  // Start the recursive branching!
  branch(120);

}

void branch(float h) {
  // Each branch will be 2/3rds the size of the previous one
  h *= 0.66;

  // All recursive functions must have an exit condition!!!!
  // Here, ours is when the length of the branch is 2 pixels or less
  if (h > 2) {
    pushMatrix();    // Save the current state of transformation (i.e. where are we now)
    rotate(theta);   // Rotate by theta
    line(0, 0, 0, -h);  // Draw the branch
    translate(0, -h); // Move to the end of the branch
    branch(h);       // Ok, now call myself to draw two new branches!!
    popMatrix();     // Whenever we get back here, we "pop" in order to restore the previous matrix state

    // Repeat the same thing, only branch off to the "left" this time!
    pushMatrix();
    rotate(-theta);
    line(0, 0, 0, -h);
    translate(0, -h);
    branch(h);
    popMatrix();
  }
}